To the people that are following, I have been on a Hiatus as you can tell. It was unplanned, and it will not last forever. Stuff has been going on, and we will all be filled in soon. Answers will be come. Soon we hope. Keep on staying tuned...
Tuesday, June 29, 2010
Friday, April 16, 2010
Monkey Balls! (I mean bread, Monkey Bread)
Wow, I have not proved myself to be much of a blogger of late. I plan on being better, just so ya know. To make it up to all of you, I made Monkey Balls! No it's bread, no it's balls! It's bread in the shape of balls with the taste of scumptious cinnamon buns. I had never heard of these till my lovely Jennifer brought it to my attention and Oh WOW are they good! She sent me the link to the recipe on the awesome smitten kitchen website, which I highly recommend. Thank you Yen! I wish I had taken pictures of us eating them, just set out on the table with forks. Pick the balls off one at a time and enjoy. You can drizzle the cream cheese glaze over the top, or have it on the side and dip'em in! They prove to be a hit for all. So, make some bread, shape it into balls, dip all the balls in some butter, sugar and cinnamon, rise and rise again, bake and partake. Dribble dribble slurp slurp.

Serves a lot.
Dough
4 tbsp. (1/2 stick) unsalted butter (divided- 2 tbsp. softened, 2 tbsp. melted)
1 cup milk, warm (about 110 degrees)
1/3 cup water, warm (about 110 degrees also)
1/4 cup granulated sugar
1 package (or 2 1/4 tsp. of rapid rise, instant or bread machine yeast)
3 1/4 cups all purpose flour, plus extra for work surface
2 tsp. table salt
Brown Sugar Coating
1 cup packed light brown sugar
2 tsp. ground cinnamon
8 tbsp. unsalted butter, melted (1 stick)
Make sure the oven rack is in the middle or middle-lower position. Heat the oven to 200 degrees, and once it hits 200, turn it off and keep the door closed. Grease the Bundt pan with 2 tablespoons (or less) of butter and put it aside.
4 tbsp. (1/2 stick) unsalted butter (divided- 2 tbsp. softened, 2 tbsp. melted)
1 cup milk, warm (about 110 degrees)
1/3 cup water, warm (about 110 degrees also)
1/4 cup granulated sugar
1 package (or 2 1/4 tsp. of rapid rise, instant or bread machine yeast)
3 1/4 cups all purpose flour, plus extra for work surface
2 tsp. table salt
Brown Sugar Coating
1 cup packed light brown sugar
2 tsp. ground cinnamon
8 tbsp. unsalted butter, melted (1 stick)
Cream Cheese Glaze
3 oz. cream cheese, softened
3 tbsp. powdered sugar, plus more if needed
2 tbsp. milk, plus extra if needed
1/4 tsp. vanilla extract
3 oz. cream cheese, softened
3 tbsp. powdered sugar, plus more if needed
2 tbsp. milk, plus extra if needed
1/4 tsp. vanilla extract
Make sure the oven rack is in the middle or middle-lower position. Heat the oven to 200 degrees, and once it hits 200, turn it off and keep the door closed. Grease the Bundt pan with 2 tablespoons (or less) of butter and put it aside.
In a bowl, mix together the milk, water, melted butter, yeast and sugar.


To make the dough with a standing mixer, use the hook attachment. First, mix the flour and salt together. Then, turn the machine to the low setting and slowly add the milk mixture. When the dough comes together, turn the machine to the medium-high setting and mix till the dough is smooth and shiny, about 6-7 minutes. If the dough is too sticky to come together, add flour a tablespoon at a time. Turn the dough onto a lightly floured surface and gently knead into a smooth, round ball.

To make the dough by hand, mix the flour and salt in a large bowl. Dig a small hole-type of well into the flour and slowly pour the milk mixture in. Using a wooden spoon, stir the milk and flour together till it becomes a hard-to-stir sticky dough. Turn the dough out onto a lightly floured surface and begin to knead it all back together. Knead until it's smooth and shiny, about 10 minutes. Shape the dough into a ball and keep on going...
Coat a large mixing bowl with your choice of lubricant, nonstick cooking spray, or a tablespoon of neutral oil. I just used more butter. Put the dough in the bowl and lubricate it with more cooking spray, oil or butter. Cover the bowl tightly with plastic wrap and place in the warm, and turned off, oven to let it rise till it's doubled in size, for about an hour.


Flip the dough out of the bowl and onto a floured surface.

Pat gently into an 8 inch square.


Using a kitchen tool of some sort (I used a simple butter knife) cut the dough into 64 squares, to become balls in the next step. Before you do this, now is a good time to melt the butter and let it cool for the dipping process.


You'll want to separate the pieces right away, otherwise they'll band back together, re-conjoin to become one big piece of dough once more.


Ball up the dough (by rolling around in the palms of your hands) and submerge in the melted butter. A fork made this much easier.

Still using the fork (unless you don't wanna) roll the balls in the sugar/cinnamon mixture.


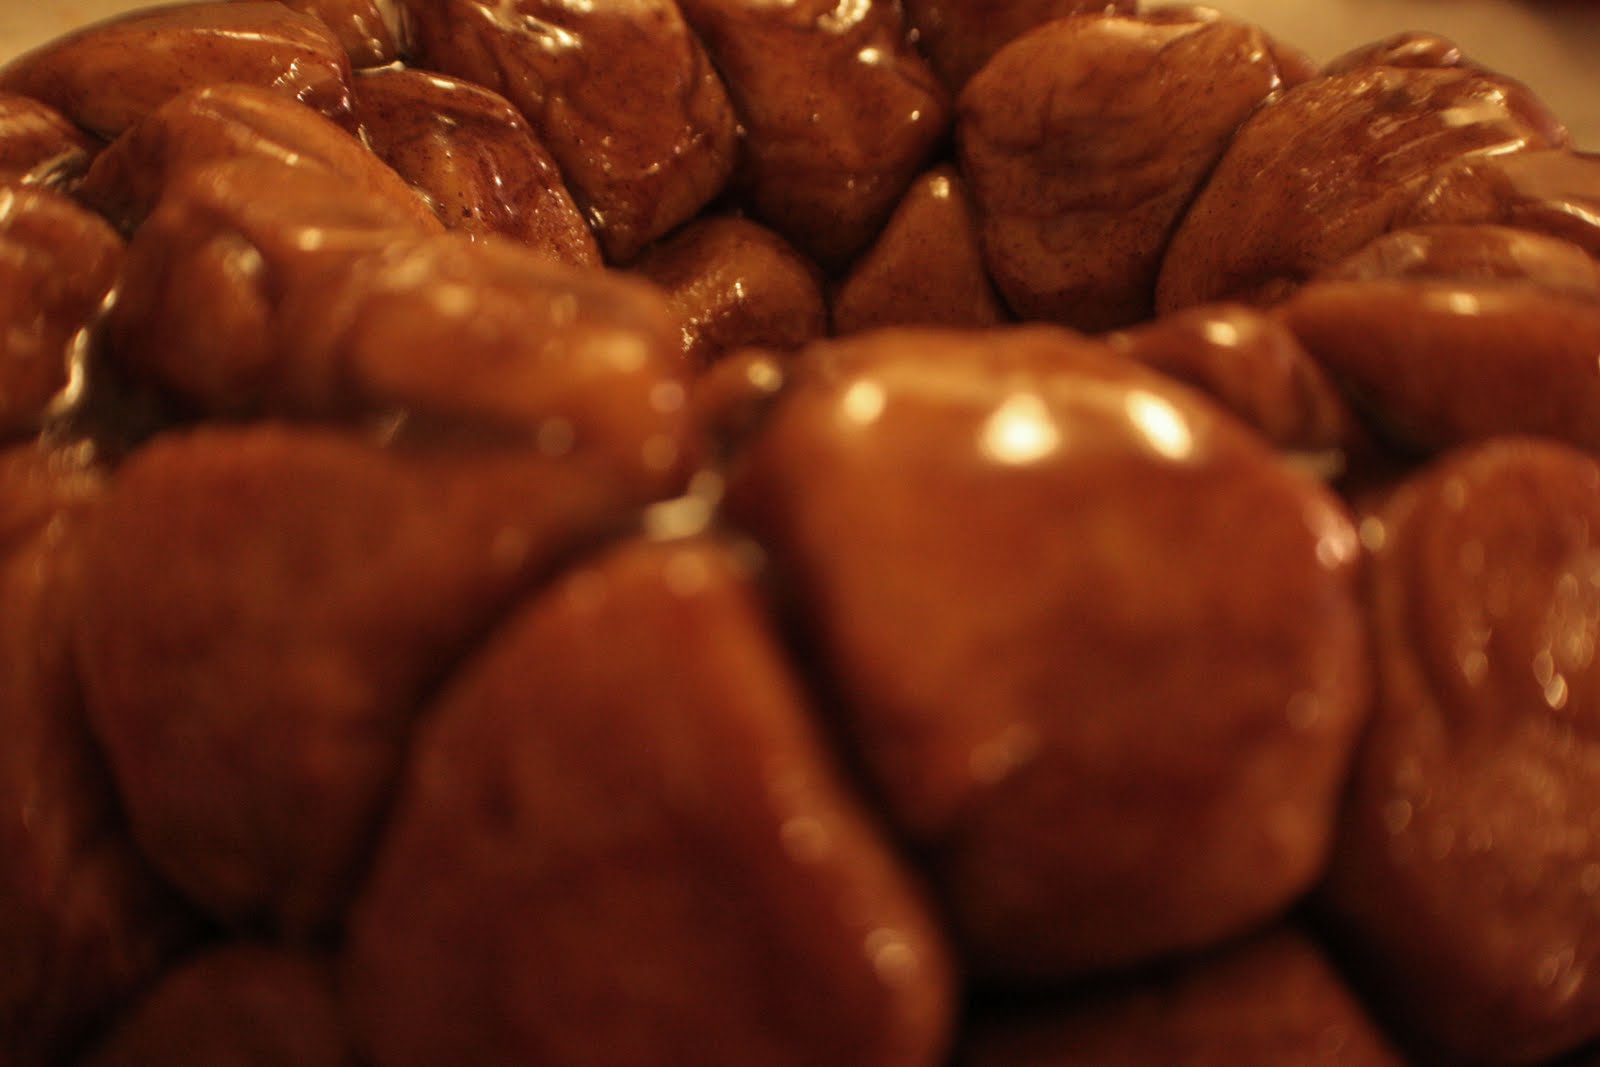
Place the butter covered, sugar/cinnamon covered balls in the greased up Bundt pan in a non-uniform, staggered non-pattern.


Cover the Bundt pan tightly with plastic wrap, and put it in the turned-off oven to let it rise once again. Give it about 50-70 minutes to rise, till the bread balls are puffed up and have risen to about 1-2 inches from the top of the pan.

Bake the Monkey Balls at 350 degrees for about 30-35 minutes, until they are brown in color and the sugar has caramelized (slurp). They may or may not bubble, mine never did, but were just so good! Excuse me while I get some water, for I am now salivating...


After baking, let the bread cool in the pan for about 5 minutes. The recipe on smitten kitchen says not to leave it in the pan for more than 5 minutes as you'll have a hard time getting it out. I found that it needed a few more minutes, maybe 7 or 8 to cool, so it would all come out in one piece. The following photo is what happened when it didn't come out in one piece. Still amazingly delicious, just not as attractive.

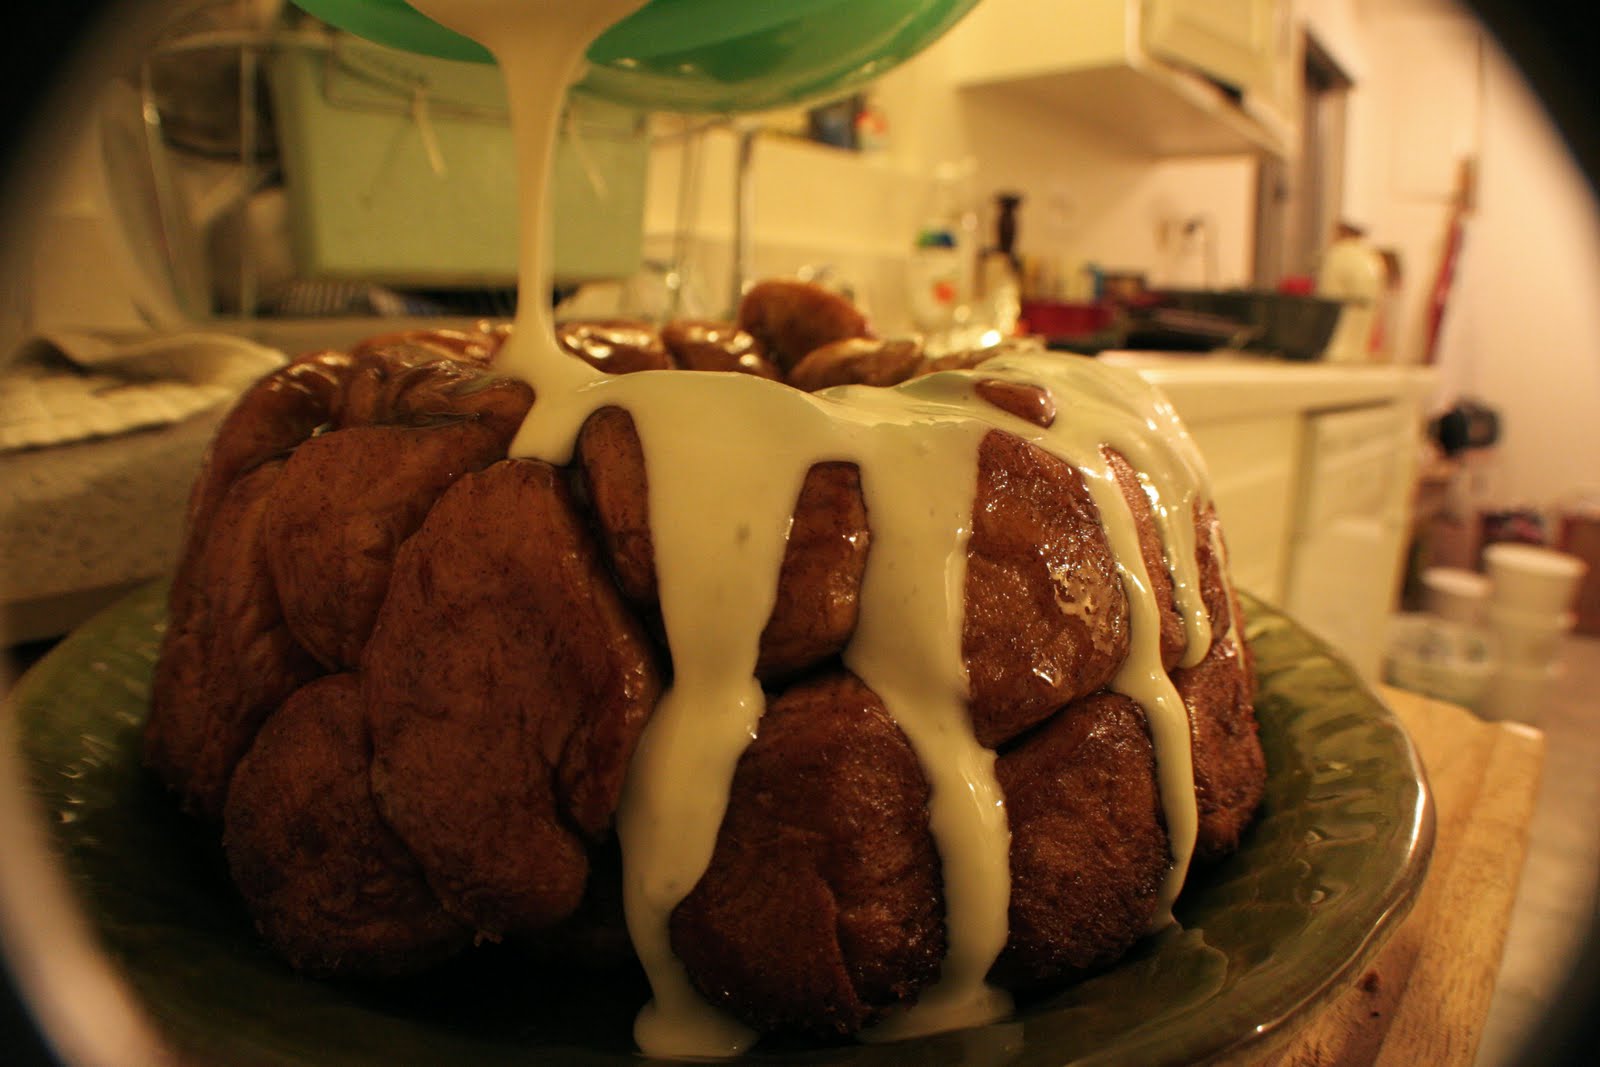
The next couple photos is when it came out all in one piece, beautifully.

And the glaze...
Beat the cream cheese with the powdered sugar till it's smooth and light. Add the milk and vanilla, which amounts can be adjusted as you please to make the texture thin enough to dribble down the sides, yet thick enough so it stay stuck to the Monkey Balls.
YUM!
Wednesday, March 17, 2010
I'll be back. Very Soon. To bake more.
Once again, I do apologize... It's been about a month since the last post. But, I have good reason! My parents were here, and it was awesome. You know you have grown up when your parents come to visit, and they stay with you. Hopefully they really thought it was awesome too, hehe. After they left, J and I moved once again. I believe this is now 8 moves in less than 7 years. Damn! I can't seem to stay in one place. One of those moves was of course for the brief stint in Portland, but that counts, a lot. So now we are moved. The place is great, yet small. We have a lot of planning for the tiny little kitchen with NO counter space and barely any cabinetry. It will be a challenge that I look forward to (not really but I'll say it anyway). It does have a yard and the BBQ'ing will commence once again. The baking will as well, but it may take a bit longer to find some working space in thrift stores that will fit adequately in this most compact of places to live. So, stay tuned, be patient, and please keep checking in to see whats goin' on. There will be baking once again, and very soon.
Good afternoon, and good luck...
Good afternoon, and good luck...
Tuesday, February 16, 2010
Tiramisu
For the few people that are following this and may be checking up on it I do apologize. It has been way too long since I have posted up a blog. I had planned on making this Tiramisu for a good while actually but that may have been the demise. Demise is the wrong word to use, but it may have been the reason it took me such a long time. I think I work better when the work is more spontaneous. I tend to get up and go, just do it, get to it faster when the planning is maybe a days worth and not two weeks worth.
Anyway, it's up, I did it, it's done. But it does need to be done again, only this time better. As good as this stuff tastes, i messed it up. The texture mainly, and I'll tell you exactly when it happened. During the whisking, the churning, the beating of the mascarpone mixture. And then once again during the churning, mixing, whisking of the heavy cream. Within a 30 second window I changed the entire texture of this most delicious of desserts to the entirely wrong texture. Not creamy and smooth as it should have been, it was now basically curdled. I don't want to use that word because it didn't go bad, but it took on the texture and look of curdled cream. I used the standing mixer to over-mixed these sensitive dairies by about 30 seconds, and noticed right away. Such a frustating thing to happen! and yet, not the worst I suppose. I did not ruin the Tiramisu as Mr. J says. He wound up eating most of it throughout the few days following as I could not bring myself to love it, as good as it tasted, it was not perfect. Such as we, the creators of whatever it is we create, are our own worst critics.
Read on to see the latest masterpiece (gone wrong)...
Recipe taken from William Sonoma http://www.heavenlytiramisu.com/rcp-138.htm
p.s. I made the Ladyfingers used in this recipe from scratch and will blog that next but if you'd like to make them and use this recipe here it is for the Joy of Baking... http://www.joyofbaking.com/Ladyfingers.html
Tiramisu!


Transfer the mixture to the bowl of a standing mixer (or use a hand-held electric mixer).


With a rubber spatula, gently fold the mascarpone mixture into the cream till blended and smooth.
Add about 1 cup of the beaten egg whites and fold gently till blended.
Add the remaining egg whites and fold gently till mixture is smooth and blended.


Arrange another layer of soaked Ladyfingers over the mascarpone cream, then spread the remaining mascarpone cream evenly over the top.


Anyway, it's up, I did it, it's done. But it does need to be done again, only this time better. As good as this stuff tastes, i messed it up. The texture mainly, and I'll tell you exactly when it happened. During the whisking, the churning, the beating of the mascarpone mixture. And then once again during the churning, mixing, whisking of the heavy cream. Within a 30 second window I changed the entire texture of this most delicious of desserts to the entirely wrong texture. Not creamy and smooth as it should have been, it was now basically curdled. I don't want to use that word because it didn't go bad, but it took on the texture and look of curdled cream. I used the standing mixer to over-mixed these sensitive dairies by about 30 seconds, and noticed right away. Such a frustating thing to happen! and yet, not the worst I suppose. I did not ruin the Tiramisu as Mr. J says. He wound up eating most of it throughout the few days following as I could not bring myself to love it, as good as it tasted, it was not perfect. Such as we, the creators of whatever it is we create, are our own worst critics.
Read on to see the latest masterpiece (gone wrong)...
Recipe taken from William Sonoma http://www.heavenlytiramisu.com/rcp-138.htm
p.s. I made the Ladyfingers used in this recipe from scratch and will blog that next but if you'd like to make them and use this recipe here it is for the Joy of Baking... http://www.joyofbaking.com/Ladyfingers.html
Tiramisu!

Ingredients
6 egg yolks
3/4 cup sugar
1 lb. mascarpone cheese, softened
2 cups heavy cream, chilled
2 tbsp. rum
1 tsp. vanilla extract
2-3 cups plus 2 tbsp. brewed espresso, cooled
5 egg whites
40-50 Ladyfingers
cocoa powder
6 egg yolks
3/4 cup sugar
1 lb. mascarpone cheese, softened
2 cups heavy cream, chilled
2 tbsp. rum
1 tsp. vanilla extract
2-3 cups plus 2 tbsp. brewed espresso, cooled
5 egg whites
40-50 Ladyfingers
cocoa powder
In the top of a double boiler, over simmering water, beat the egg yolks and sugar till the mixture is pale yellow and thick ribbons fall from the whisk. 4-5 minutes.


Transfer the mixture to the bowl of a standing mixer (or use a hand-held electric mixer).

Add the mascarpone cheese and beat till smooth and creamy, about 2-3 minutes.

In a chilled large mixing bowl. beat the cream to stiff peaks.
(I over-mixed by maybe 30 seconds or so and this is how it turned out)
(I over-mixed by maybe 30 seconds or so and this is how it turned out)

Add the rum, vanilla and 2 tbsp. of espresso and beat till smooth.
In a clean mixing bowl, beat the egg whites to stiff peaks.
In a clean mixing bowl, beat the egg whites to stiff peaks.


With a rubber spatula, gently fold the mascarpone mixture into the cream till blended and smooth.
Add about 1 cup of the beaten egg whites and fold gently till blended.
Add the remaining egg whites and fold gently till mixture is smooth and blended.
Submerge each ladyfinger into the remaining espresso. The recipe I used says to use a 6-quart glass or ceramic baking dish. I didn't have one that big so I used a 4.8-quart dish, about 2 inches deep, and it seemed to work just fine. I had a few extra ladyfingers, but may not have had enough if I had used the 6-quart-er. Line each lady finger along the bottom of the dish as the first layer.


Continue to form a complete layer.

Spread half of the mascarpone mixture over the soaked ladyfingers until evenly covered.


Arrange another layer of soaked Ladyfingers over the mascarpone cream, then spread the remaining mascarpone cream evenly over the top.


Dust the Tiramisu with cocoa powder to create a rich and dark topping.


Refrigerate for at least 4 hours, or up to 1 day before serving to well-deserving people.

Subscribe to:
Comments (Atom)
